How to Fix Candle Tunneling:
The Aluminum Foil Trick & Wick Sizing Rules
Published on October 26, 2026 • By MakerRatio Studio Team • Calibrated to ASTM F2417 Fire Safety & Rate of Consumption Kinetics
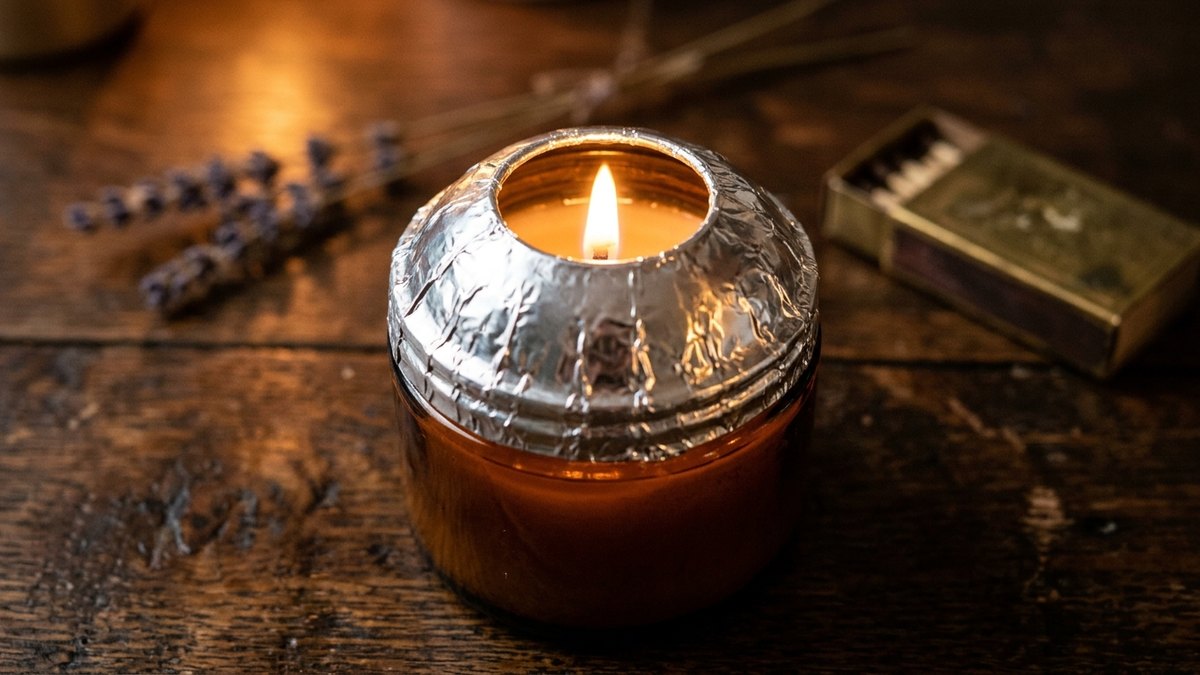
Thermal Fluid Mechanics: Parabolic heat reflection dome, edge-to-edge molten pool resetting, and Rate of Consumption (ROC) formulas.
How do you fix candle tunneling with aluminum foil? Wrap a sheet of standard kitchen aluminum foil around the perimeter of the candle jar, folding the top inward to form a domed chimney with a 1-inch (25mm) opening above the flame. Light the candle and let it burn for 30 to 45 minutes. The foil dome acts as a parabolic reflector, trapping escaping radiant heat and melting the high ring of leftover hard wax down into a flat, edge-to-edge molten pool. Once reset, extinguish the flame, remove the foil, and maintain proper wick burn time rules.
Calculate Vessel Wick Sizes & Full Burn Times
Match your container inside diameter to CD, ECO, or Heinz series wicks and determine whether double-wicking is mandatory to eliminate tunneling forever.
The Thermodynamics of Candle Tunneling: The "Memory Ring"
Candle tunneling occurs when a wick burns straight down the center of a wax pillar or jar, leaving a thick, hard perimeter of unburned wax clinging to the container walls. Eventually, the flame drowns in its own molten wax pool or starves of oxygen inside the deep trench, wasting up to 60% of an expensive scented candle.
Candle waxes—especially crystalline vegetable waxes like hydrogenated soybean triglycerides (Golden Wax 464) and beeswax—possess thermal memory. Wax is a poor conductor of heat. When a candle is lit, the flame's radiant heat creates a circular melt pool via thermal convection:
If you extinguish the candle before the molten pool reaches the outer container walls (for instance, burning a 3-inch candle for only 30 minutes on its first light), the wax cools and establishes a hardened thermal boundary perimeter. On every subsequent burn, the flame will only melt wax up to that preexisting boundary, burrowing downward like a drill bit.
The Aluminum Foil Tent Method: Step-by-Step Physics
The aluminum foil trick is the fastest and most reliable way to reset a tunneled candle without buying heat guns or carving away expensive scented wax. Here is the exact studio procedure:
Step 1: Tear and Size the Foil
Tear a piece of heavy-duty aluminum foil approximately 12 inches long (30 cm). The height of the foil should be at least 3 inches taller than your candle jar.
Step 2: Form the Parabolic Reflection Dome
Wrap the foil tightly around the circumference of the glass container. Fold the excess top foil inward toward the center, creating an angled dome or cone. Leave an open circular chimney hole measuring 1 to 1.5 inches in diameter at the very top.
Critical Combustion Rule: Never cover the top completely. A flame requires a continuous influx of fresh oxygen ($O_2$) from convection currents and an exhaust vent for carbon dioxide and water vapor. Sealing the top smothers the flame immediately.
Step 3: Burn for 30 to 45 Minutes
Light the wick through the chimney opening and monitor the candle. Aluminum foil has a thermal reflectivity of over 95%. Instead of rising into the room air, infrared radiation reflects inward and downward against the high wax walls, warming the container to approximately 140°F (60°C).
Step 4: The Wick Drowning Check & Cotton Ball Reset
Within 30 minutes, the outer wax walls melt completely, creating a flat, liquid pool from edge to edge.
If the wick begins drowning: Extinguish the flame, take a clean cotton makeup pad or folded paper towel, and gently dip it into the excess liquid wax near the glass edge to soak up 1 to 2 tablespoons of molten wax. This restores the exposed wick height to 1/4 inch (6 mm) so the flame burns with robust vigor.
Two Alternative Recovery Methods: Heat Gun & Water Bath
Method B: Studio Heat Gun Sweep
Set an electric craft heat gun to low heat (approx. 250°F / 120°C). Hold the nozzle 6 inches away from the jar and move in continuous circular sweeps around the upper wax shelf until it melts flat.
Caution: Never hold the heat gun stationary on glass jars, as localized thermal shock can crack thick soda-lime glass.
Method C: Warm Water Bath Soak
Place the unlit candle jar inside a shallow metal pan filled with hot tap water (130°F / 55°C) reaching halfway up the candle height for 20 minutes to soften the wax mantle before lighting.
Rule: Never let water splash into the wax, as boiling water causes violent steam spattering when heated by the wick flame.
How Chandlers Prevent Tunneling: Wick Sizing & ROC Math
If you are a candle maker selling your products, customers should never need aluminum foil to burn your candles cleanly. Permanent prevention comes down to strict combustion engineering:
The Rate of Consumption (ROC) Equation:
Chandlers calibrate wick sizes by measuring how many grams of wax the flame consumes per hour of continuous burn:
• Under-wicked (< 3.0 g/hr in 3" jar): Low melt pool diameter, flame flickers weakly, guaranteed tunneling.
• Balanced (4.5 to 5.5 g/hr in 3" jar): Full 1/4" melt pool reaching container glass at exactly 2 to 3 hours with zero soot.
• Over-wicked (> 7.0 g/hr): Heavy soot, mushrooming wick carbon, and jar glass exceeding ASTM F2417 safe touch limits (140°F / 60°C).
1. The Golden 1-Hour-Per-Inch Diameter Rule
Educate your buyers with a warning label: The very first burn must last at least 1 hour for every 1 inch of container diameter. A 3-inch jar candle must burn uninterrupted for a full 3 hours on day one.
2. The 3.0-Inch Double-Wicking Threshold
No single cotton wick on the market can cleanly melt soy wax across a vessel diameter exceeding 3.25 inches (82 mm) without generating excessive smoke and carbon mushrooms. For wide tumblers, shallow bowls, and 3-wick dough bowls, always space two or three smaller wicks (such as dual CD 6 or ECO 4) spaced 1.25 inches apart.
Verified Candle Waxes, Wicks & Packaging
Source bulk 45-lb cases of Golden Brands 464, genuine Heinz Verhaegh CD wick spools, and thermal shock-tested glass jars from verified USA distributors like CandleScience and Lone Star Candle Supply.
Frequently Asked Questions (Candle Tunneling & Wicks)
Why do candles tunnel even when burned for hours?
If a candle tunnels despite burning for 3 to 4 hours, the wick is fundamentally undersized for that container diameter or wax type. A flame cannot generate enough thermal convection to reach outer glass if the wick core is too small.
How long should you leave the foil tent on a tunneling candle?
Leave the foil tent on for 30 to 45 minutes until the unburned wax rim around the glass perimeter has melted completely flat into the central liquid pool, then remove the foil with tongs or oven mitts.
Does trimming the wick cause candle tunneling?
Trimming a wick too short (under 1/8 inch or 3 mm) produces a microscopic flame that lacks the heat energy to melt wax to the edges, inducing tunneling. Always trim wicks to exactly 1/4 inch (6 mm) before lighting.
Can fragrance oil overload cause tunneling in soy candles?
Yes. Exceeding 10% fragrance oil load clogs the cotton wick capillaries with heavy aromatic compounds, reducing capillary wax draw. This creates a smaller, struggling flame that fails to reach the jar walls.
Is aluminum foil on a burning candle jar safe?
Yes, provided you leave a 1-inch chimney hole at the top for airflow and never leave the burning candle unattended. The glass container will become very hot, so do not touch the jar directly until it cools.
How do you fix a wick that is already buried under hardened wax?
Warm the top wax surface with a craft heat gun or hair dryer until the wax around the wick liquefies. Pour off 1 tablespoon of melted wax into a disposable paper cup, use tweezers to pull the wick tip upright, and let the wax re-harden before lighting.