How to Fix Sticky, Soft, or Tacky Epoxy Resin:
4 Workshop Recovery Protocols
Published on August 26, 2026 • By MakerRatio Materials Lab • Verified via Polymer Stoichiometry
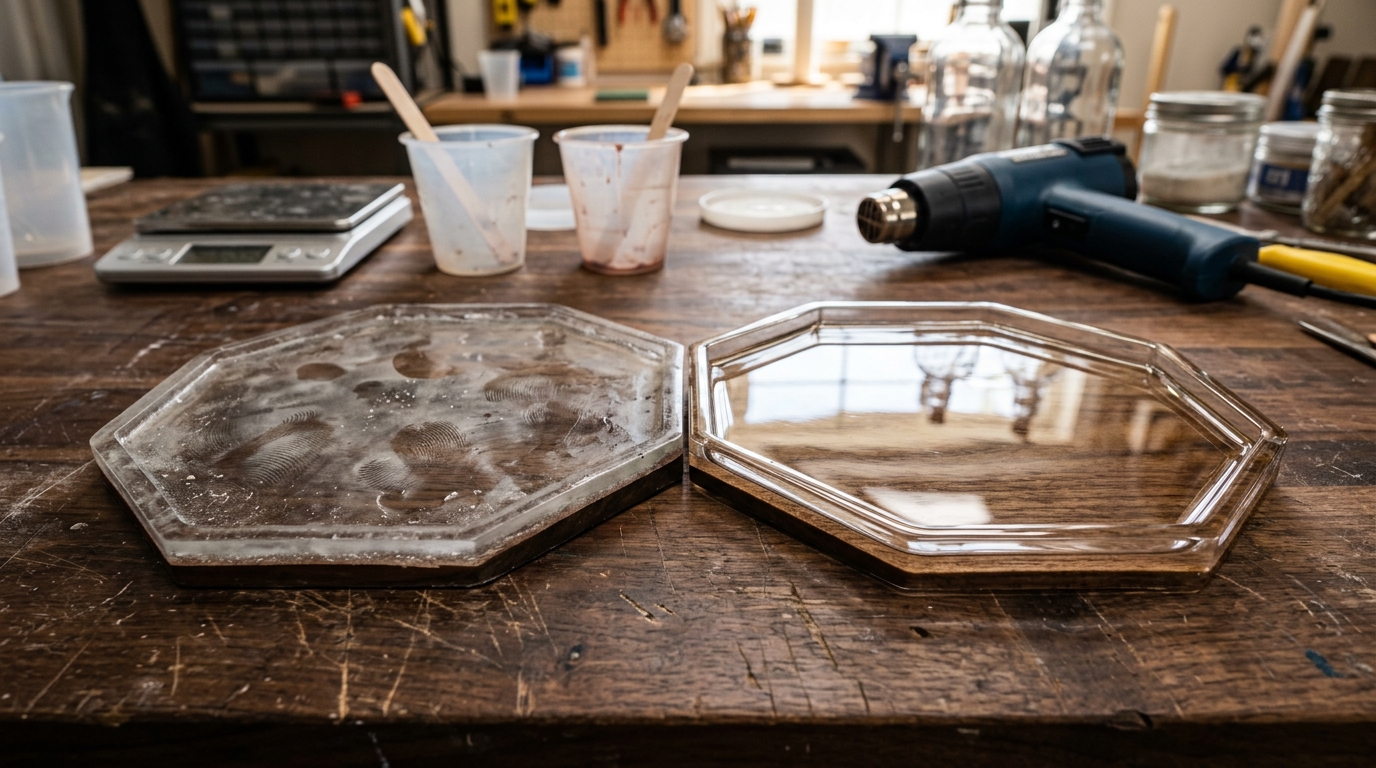
Studio Diagnostics: Uncured amine blush & ratio deficit (left) vs chemically recovered Shore 85D casting (right).
Can sticky resin be fixed? Yes, depending on the severity. If the piece is merely surface-tacky due to low temperature or humidity, thermal post-curing at 120°F (50°C) for 3–5 hours will complete the cross-link. If sticky due to an unmixed surface layer, scrape the uncured liquid, clean with 99% isopropyl alcohol, sand with 80-grit paper, and pour a fresh 1:1 flood recoat layer. If the internal ratio was off by more than 15%, the core will remain permanently soft and must be scraped out completely.
Calculate Exact Flood Recoat Volumes
Avoid ruined batches forever. Calculate exact 1:1 or 2:1 Part A & Part B gram weights with density and waste factors applied automatically.
Nothing in the maker world triggers an instant sinking feeling quite like touching your cured epoxy project 48 hours after pouring—only to leave a permanent, sticky fingerprint embedded right in the center.
You waited two full days. You bought a reputable resin brand. You watched the YouTube tutorials. Yet, when you attempt to demold the tray, coaster, or river table, the surface feels like gummy tape, flexible rubber, or worse—a runny layer of syrup that ruins your workbench.
Before you throw a $150 wood slab or silicone mold into the trash bin, understand this: uncured epoxy is a chemical failure with a specific, identifiable physical cause. In over 80% of workshop cases, the piece can be chemically stabilized, sanded, and recoated to a flawless mirror finish.
Step 1: Diagnose Your Exact Resin Failure State
Not all sticky resin is the same. Polymer engineers categorize epoxy curing failures into four distinct physical stages. Touch your casting and identify which category you are facing:
| Failure Stage | Physical Texture | Root Chemical Cause | Can It Be Saved? |
|---|---|---|---|
| 1. Surface Tacky | Hard underneath, but leaves a sticky smudge or greasy film on top. | Low room temp (<68°F / 20°C) or high humidity creating an amine blush film. | 100% (Post-Cure or Wipe) |
| 2. Localized Sticky Spots | 90% of the piece is rock-hard, but 2 or 3 corners are liquid or gummy. | Unmixed resin scraped from the container walls or bottom during pouring. | 95% (Spot Repair + Flood) |
| 3. Soft / Gummy Rubber | Dents under fingernail pressure like a silicone tire; bends without snapping. | Incorrect mix ratio (e.g. 5–10% error by volume vs weight). | 70% (Heat Bake + Hard Cap) |
| 4. Liquid / Runny Sludge | Completely liquid after 72 hours; never generated exothermic heat. | Forgot Part B entirely, or used a 2:1 hardener with 1:1 resin base. | Must Scrape & Restart |
The Chemistry: Why Adding "Extra Hardener" Made It Worse
The most widespread mistake among hobbyists is assuming that epoxy behaves like polyester resin or automotive body filler, where adding "a few extra drops of catalyst" accelerates curing.
The Stoichiometric Reality: Epoxy does not cure via catalytic initiation. It cures through a 1-to-1 molecular cross-linking reaction (stoichiometry) between the epoxide rings in Part A (Bisphenol A/F) and the amine hydrogen atoms in Part B (Polyetheramines / Cycloaliphatic Amines).
If your formula specifies a 1:1 ratio, every single Part A molecule requires exactly one Part B amine bond. If you add 10% extra hardener, those excess amine molecules have no epoxide partners to bind with. They remain free-floating liquid molecules suspended in the matrix—resulting in a permanently soft, sticky casting that will never reach full Shore 85D hardness.
The 4 Proven Workshop Recovery Protocols
Method 1: Thermal Post-Curing (For Cold-Stalled & Tacky Surfaces)
Best For: Pieces poured below 70°F (21°C) or slightly flexible castings after 48 hours.
Epoxy reactions slow dramatically as room temperature drops. At 60°F (15°C), curing can take 4x longer, stalling before the glass transition temperature ($T_g$) is reached. You can force the chemical reaction to completion using controlled heat:
- Place the casting on a heat mat or inside a dedicated curing oven set to 120°F – 130°F (49°C – 54°C).
- Maintain this temperature for 3 to 5 hours.
- Do not exceed 140°F (60°C) to prevent silicone mold degradation or thermal warping.
- Allow the piece to cool back to room temperature before handling. If the stoichiometric ratio was correct, the surface will transition to rock-hard gloss.
Method 2: Chemical Cleanse & Sanding (For Amine Blush & Greasy Film)
Best For: Hard castings that have a greasy, cloudy, or waxy surface film caused by ambient moisture.
When polyamine hardeners react with atmospheric carbon dioxide and water vapor, they form a byproduct called Amine Carbamate (Amine Blush). Never pour fresh epoxy directly over amine blush—the new layer will delaminate:
- Wash the surface with warm water and standard dish soap using a non-abrasive sponge (Amine salts are water-soluble; solvent alone will not dissolve them).
- Dry completely, then wipe with 99% Isopropyl Alcohol (IPA) or Acetone to eliminate all residual oils.
- Dry-sand the entire surface using 120-grit to 220-grit sandpaper until the sheen is uniformly matte. This provides the crucial mechanical profile for the next step.
Method 3: The 1:1 Barrier Flood Recoat (The Definitive Fix)
Best For: Trays, coasters, and tabletops that have been cleaned and sanded.
Once you have removed uncured material and established a scuffed mechanical profile, pouring a self-leveling 1:1 tabletop flood coat creates an impenetrable, crystal-clear barrier:
- Weigh Part A and Part B on a 0.01g precision scale (never use uncalibrated volume lines).
- Mix for a full 3 minutes with a flat-edged stir stick, scraping the bottom and sides continuously.
- Transfer to a second clean cup and mix for another 60 seconds (double-cup technique).
- Pour a 1/8" (3mm) flood layer and sweep with a dual-temperature heat gun to pop all surface tension bubbles.
Method 4: Scrape & UV Resin Spot Seal (For Localized Corners)
Best For: Small jewelry, cabochons, or deep corners where only a tiny puddle remains liquid.
If 98% of your casting is perfect but a tiny corner was contaminated by unmixed resin from the wall of your mixing cup:
- Scrape out the liquid pool using a wooden chisel or silicone spatula.
- Wipe the cavity completely dry with acetone on a lint-free shop towel.
- Fill the void with a high-viscosity UV Craft Resin and cure under a 365nm/395nm UV lamp for 120 seconds. UV resin cures via photoinitiators and bonds instantly to the epoxy matrix.
Verified Workshop Materials for Recovery
When executing a flood coat recovery, material quality and measurement accuracy are non-negotiable. These are our workshop-tested materials matched strictly to manufacturer Technical Data Sheets:
Recommended Materials & Tools for this Project
Puduo 1:1 Crystal Clear Tabletop Epoxy
Formula: 1:1 mix ratio. High-gloss self-leveling surface coating for countertops, tumblers, and shallow mold castings.
Dual-Temperature Craft Bubble Heat Gun
Specification: Focused thermal airflow nozzle for popping surface micro-bubbles in fresh resin and smoothing candle tops.
Transparency Notice: As an Amazon Associate, MakerRatio earns from qualifying purchases at zero extra cost to you. Product recommendations are selected based on verified Manufacturer Technical Data Sheets (TDS). Always consult chemical safety data before pouring.
Frequently Asked Questions About Sticky Resin
Will sticky resin eventually cure if I wait another week?
If the stickiness is caused by low ambient temperatures (below 68°F / 20°C), warming the piece will allow it to finish curing within 48 hours. However, if the sticky surface is caused by an incorrect mixing ratio or unmixed resin from the cup walls, it will never cure on its own—regardless of how many weeks you wait. The chemical reactants lack binding partners and must be addressed with a post-cure, scrape, or flood coat.
Can I just pour fresh epoxy directly over sticky resin?
No. Never pour fresh epoxy over wet or syrupy resin. The uncured liquid creates a barrier that prevents the new layer from forming a mechanical or chemical bond, leading to bubbling, cloudy delamination, and peeling. You must always scrape away liquid sludge, clean with 99% isopropyl alcohol, and scuff-sand the solid base before pouring a new flood coat.
Can I use Mod Podge, clear nail polish, or spray varnish over tacky resin?
Acrylic sprays, Mod Podge, and nail polish are not structurally compatible with unreacted epoxy amine groups. Over time, the trapped uncured amines will soften the clear coat from underneath, causing yellowing, hazing, and sticky wrinkling. Always use a proper 1:1 epoxy flood coat or UV resin for permanent repair.
Why should I measure epoxy by weight instead of volume lines?
Part A (epoxy base) and Part B (hardener) have different specific gravities (densities). Part A is typically denser (1.15 g/ml) than Part B (0.98 g/ml). In 1:1 volumetric kits, printed plastic cup marks have a 5–10% margin of error due to manufacturing imperfections. Using a digital gram scale calibrated to your resin brand's exact weight ratio eliminates human measurement error entirely.
Prevent Your Next Short-Pour or Ratio Error
Use MakerRatio's validated mathematical volume engines for silicone molds and deep pours.