How to Fix Pottery Glaze Bubbles, Pinholes
& Crawling: 5 Studio Recovery Methods
Published on October 26, 2026 • By MakerRatio Studio Team • Calibrated to Drop-and-Hold Kiln Schedules & Degassing Kinetics
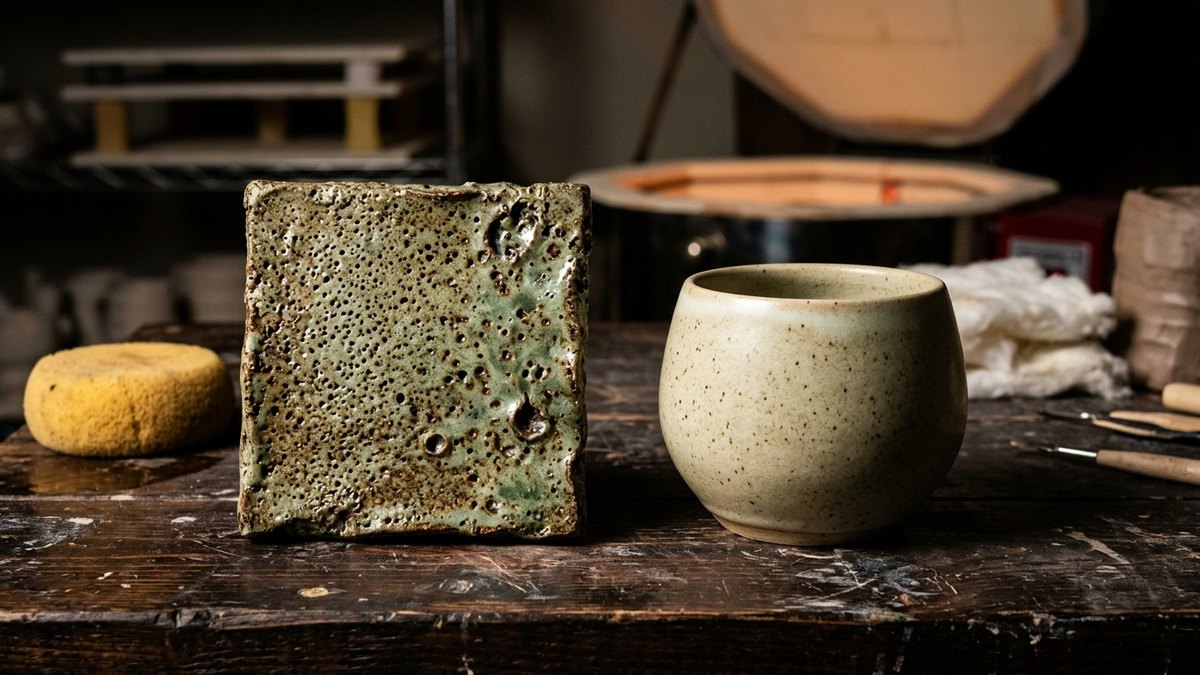
Ceramic Defect Recovery: Outgassing bubble mechanics ($CO_2$ & $SO_2$ release), bisque prep protocols, and 100°F drop-and-hold kiln programs.
Why do pottery glazes get pinholes, bubbles, and crawling? Glaze bubbles and pinholes occur when trapped gases from decomposing raw carbonates and sulfates (CaCO₃ → CaO + CO₂↑) escape through the molten glaze while the kiln cools too quickly to heal the surface. The single most effective fix is a Drop-and-Hold Kiln Schedule: fire to peak cone (e.g., Cone 6 at 1222°C), soak for 15 minutes, rapidly drop the temperature by 100°F (55°C) to freeze outgassing, and hold for 30 minutes at that lower temperature to let molten glass smooth over craters. Crawling is caused by dusty bisque or applying glaze thicker than 1.5mm.
Calibrate Glaze Slurry Specific Gravity & Batch Volumes
Avoid over-thick glaze dripping and pinhole-inducing slurry density with our studio batch calculation engine.
The Physics of Ceramic Pinholes: Gas Outgassing Kinetics
Opening a glaze kiln to find dozens of tiny volcano-like craters, blisters, or pinholes across your mugs is one of the most frustrating experiences in pottery. To eliminate pinholes permanently, you must first understand the physics behind how they form.
Clay bodies and raw glaze minerals are not chemically inert powders. Natural clays contain organic vegetable matter, carbon, sulfur compounds, and carbonates (such as calcium carbonate in whiting and dolomite). As the kiln climbs past 900°C (1652°F), these compounds chemically decompose, releasing volumes of volatile gases:
At temperatures above 1150°C, the glaze melts into a viscous, honey-like liquid sheet. If the underlying clay body is still venting trapped carbon dioxide and sulfur dioxide gas, those gas bubbles must force their way upward through the molten glaze layer into the kiln atmosphere.
If the glaze is overly viscous (too high in alumina or too low in melting fluxes), or if the kiln begins cooling the moment it reaches its target cone, the bubble bursts at the surface, but the glass freezes before surface tension can pull the molten crater flat. The result is a sharp, permanent pinhole.
Recovery Method 1: The 100°F Drop-and-Hold Kiln Firing Schedule
The traditional method of firing an electric kiln is a linear ramp up to peak temperature followed by shutting off the elements completely. This is the primary cause of cratered glazes.
The modern ceramic engineering solution is a Drop-and-Hold Firing Schedule. Here is the verified Cone 6 digital controller program:
Standard Cone 6 Drop-and-Hold Kiln Profile:
Why this works: Dropping the kiln temperature by 100°F immediately stops the clay body from outgassing additional carbon. However, at 2132°F (1166°C), the glaze remains fluid enough that liquid surface tension pulls all existing burst bubble craters flat, producing a flawless, silky finish.
Recovery Method 2 & 3: Bisque Preparation & Crawling Elimination
Method 2: The Bisque Sponge De-Dusting Protocol
Bisque ware fresh from the kiln is covered in a microscopic layer of ceramic particulate dust and residual alumina kiln wash. Furthermore, handling bisque with bare hands deposits natural body oils onto the porous clay surface.
If glaze slurry is dipped over dust or finger oils, the liquid cannot achieve intimate capillary wetting with the ceramic surface. During firing, the glaze curls away from the dusty spot, pulling into beads like water on a freshly waxed car hood. This defect is called crawling.
Studio Protocol: Always wipe down every bisque piece with a clean, damp (wrung-out) cellulose sponge 30 minutes before dipping. Never soak bisque in a water bucket immediately before glazing, as saturated pores cannot absorb liquid glaze.
Method 3: Coat Thickness Calibration (The 1.0mm Rule)
One of the most common beginner errors is applying too much glaze. When a glaze layer exceeds 1.5mm to 2.0mm of dry thickness, three catastrophic failures occur:
- Shrinkage Cracking: High-clay glazes contract excessively during drying, creating hairline fissures in the green glaze layer that separate into crawling patches when heated.
- Volcanic Blistering: Heavy glaze traps deep outgassing bubbles that cannot rise through the thick molten glass before kiln freeze.
- Downward Runoff & Kiln Shelf Fusing: Molten glaze cascades down vertical mug walls, pooling into thick rims that weld pottery permanently to kiln furniture.
Recovery Methods 4 & 5: Salvaging Already Ruined Pottery
If you already have a batch of glazed pieces ruined by pinholes or minor glaze running, you do not need to throw them in the studio trash heap:
Method 4: Diamond Burr Grinding & Re-glaze Firing
Use a rotary tool (Dremel) with an 80-grit diamond ball burr to grind out the sharp edges of pinholes and glaze drips. Wash thoroughly with rubbing alcohol. Warm the piece with a heat gun to 120°F, apply a tiny dab of glaze slurry with a fine watercolor brush, and refire using the Drop-and-Hold schedule.
Method 5: Increasing Bisque Firing Temperature
If your clay body consistently produces pinholes regardless of glaze schedule, your bisque firing is too low. If you currently bisque at Cone 06 (998°C), step your bisque firing up to Cone 04 (1060°C) with a 20-minute soak to burn out all sulfur and carbonates before glaze application.
Studio Kilns, Controllers & Glaze Supplies
Upgrading to a digital programmable kiln controller (Skutt KilnMaster, L&L Genesis) or stocking up on commercial brush-on glazes? Explore verified USA distributors with studio freight delivery.
Frequently Asked Questions (Glaze Defects & Pinholes)
Can you refire a glazed pottery piece to fix pinholes?
Yes. Simply refiring the piece to the original cone with a Drop-and-Hold schedule (holding 100°F below peak for 30 minutes) will often heal over 80% of pinholes without needing additional glaze.
What is the difference between glaze crawling and crazing?
Crawling is when molten glaze pulls away from dusty or greasy bisque, leaving bare exposed clay patches. Crazing is a thermal expansion mismatch where the glaze covers the clay completely but develops a spiderweb network of fine hairline cracks.
Why does my glaze crawl in corners and crevices?
Glaze naturally pools thicker inside inside corners and sharp carved details during dipping. The thick glaze layer cracks as it dries on the bisque. During firing, surface tension pulls the cracked edges inward into beads rather than smoothing out.
How does bisque temperature affect glaze pinholes?
A higher bisque firing (such as Cone 04 instead of Cone 08) burns out volatile carbon, sulfur, and organic matter completely before glazing, preventing those gases from bubbling through the glaze during the second firing.
How thick should dry glaze be on bisque pottery?
A standard glaze coat should measure between 1.0mm and 1.2mm in dry thickness (approximately the thickness of a standard business card or fingernail). Exceeding 1.5mm dramatically increases pinholing and running.
Why do glazes pinhole more on brown or dark stoneware clay?
Dark stoneware clays contain significant amounts of natural iron oxide and manganese compounds. At Cone 6 temperatures, iron oxides reduce and release gaseous oxygen, which bubbles directly through the molten glaze layer.